
Howdy Friends! Many horses, like my Kessy, have breathing issues, and should never have moldy, or slightly moldy, or even dusty hay. And horses with no issues can develop them eating dusty, or moldy hay.
Soaking hay not good enough.
My research proved to me that soaking is not good enough, research and my own trials. Mold spores don’t die if soaked, but they do die at temperatures above 130 degrees, and steam of course occurs above 210. I checked the temps in my steamer, inside flakes of hay, it is consistent at 180.
I built my first hay steamer from plans I found on the internet. I’d been soaking Kessy’s hay, and that worked, sort of. But she got worse over time, so I built the steamer. Note here, even on the steamed hay eventually she developed full blown heaves … with management practice adjustments, and help from Dr Thomas’ Chinese Herbs (Read that story HERE) she recovered TOTALLY. I point this out because addressing all aspects is sometimes what it takes. Another note—whether we see it or not, most hay has some mold in it, of course sometimes we actually see and smell it.
So here is a very simple way to build your own steamer for about $100.00.
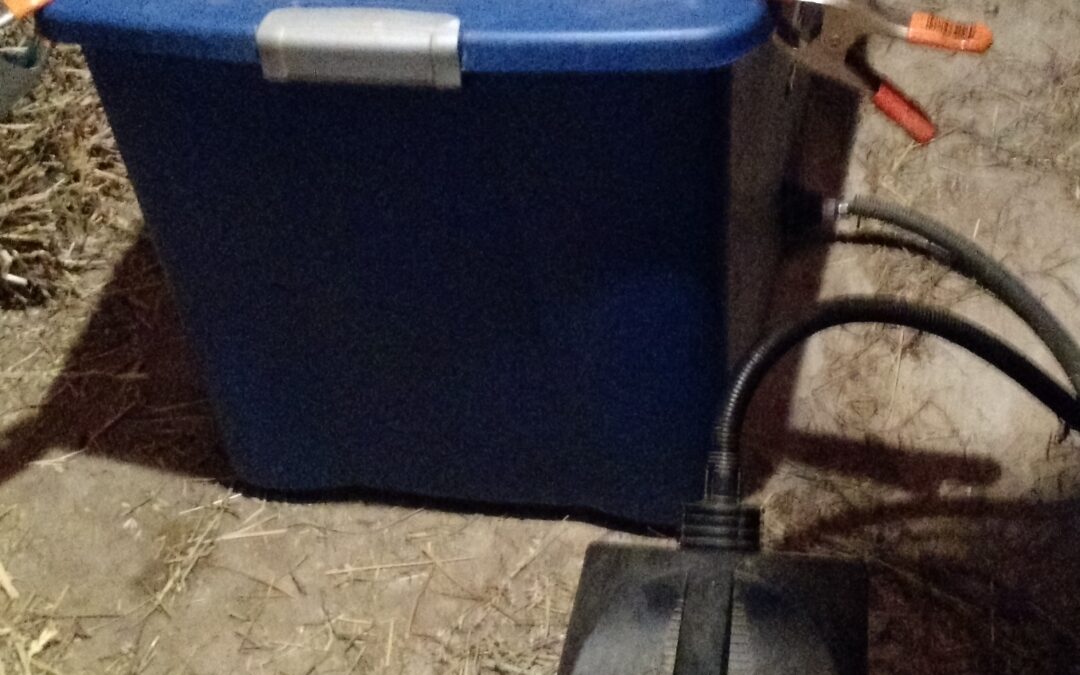
I start with a big storage tote found everywhere. I like the largest I can find, mine is 36 inches by 20 and 20 inches high.
The steam is produced by a Wagner Wallpaper Steamer I bought at Lowes for $69.00. I have mine set on a timer to steam just before I feed morning and night for 2 hours, so it’s always fresh and always ready. Note—you must use a heavy duty timer or it’ll burn out the steamer, I learned the hard way.
How to build the steam manifold
My steam manifold is made of 36 inches of 1 inch CPVC pipe (you need to buy 48 inches to make the tee you see in the picture). Important to use CPV as regular pvc can’t take the heat (my first manifold I made that mistake and my manifold fell apart quickly). You’ll also need the tee, and end caps for the pipe, and CPVC nut to attach to pass through adapter you see in the picture. On the 36 inch piece of CPVC I drilled ¼ inch holes every 4 inches for steam flow.
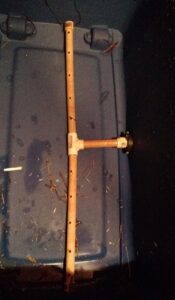
CPVC pipe on floor of tub
Drill a 1 inch hole in the side for the steamer hose to pass through, as pictured, and I used heat tolerant plastic fittings and washers to make the pass-through completely sealed. You can find what you need at any hardware store.
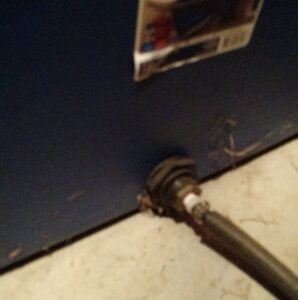
Drill hole in the side to connect hose to CPVC pipes
You just need to adapt (with an easy to buy adapter/reducer fitting. It’ll take a few pieces to get it from ½ inch to 1 inch) from the small ½ inch hose (which you’ll cut to about 3 feet) attached to the steamer manifold which is 1 inch.
Finishing touches
Inside the lid I put smooth weather-stripping to cause a seal. Remember to wipe off the lid with rubbing alcohol so it will stick.
Attach the hose from the steamer to the pass through adapter (I cut it at 3 feet length), and you’re ready to steam. Steaming time can vary, should not be less than 45 minutes, I like 2 hours—my provider bales REALLY tight bales and less than 2 hours did not always steam all the way through good enough.
I like to steam in the bags, easier and neater. When I feed, I always dump the water out of the steamer. There will be a few cups of water in the bottom, and it’s best to dump out each steaming.
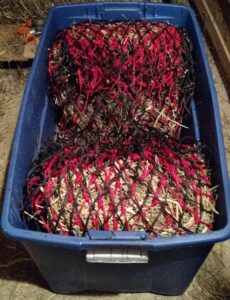
I like to steam the hay in the slow hay feed nets, then ready to go.
There ya go, an easy to build, easy to use hay steamer. Hope this helps you! ~ Gitty Up, Dutch Henry.


